

If you’re interested in getting started canoeing, or love canoeing and are looking for some fresh tips, keep reading. This week, we talk about terminology, basic strokes, safety, and rescues.
Don’t miss out on How to Get Started Canoeing in 2020 – Part II (Intermediate Canoe Skills) and Part III (Advanced Canoe Skills) in the coming weeks, where we’ll go much deeper!
Table of Contents
My First Canoe Experience
My first experience with canoeing came from a rental and shuttle service located in a park in my hometown. I was about seven, and we had family in town.
We got fitted for life jackets and paddles, and hopped in a van for a ten minute drive to a put-in. The trip back down the river takes about 2-3 hours, depending on water level and how many trees are down.
We made it about 30 feet down the river before flipping the boat. When my mom and I surfaced, me screaming about hating it and going home, my uncle sailed by, laughing that we had been in the canoe backwards.
By the end of the trip I was much happier with canoeing, but it was a rough start. To help you have a better start, here is everything you need to get started canoeing.
This is the first of a three part series, which will go into Intermediate and Advanced Canoeing in the coming weeks.
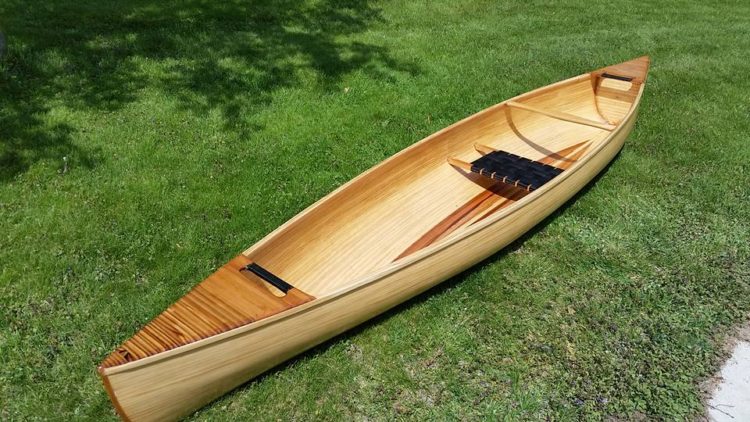
Canoe and Paddle Anatomy
It’s tough to talk about something without words to describe the parts and pieces. To avoid phrases like “the pointy bit near the front end” clogging up the later instructional sections, we’ll start by checking out the parts of the canoe and paddle.
Canoe Anatomy

The first trick to using a canoe is figuring out which end is the front. While sculpted plastic seats can give a pretty good clue, many canoes feature woven bench seats. The front of the canoe, or bow (marked as 1 in the diagram above) is the end with more space between the seat and the end of the boat. Remember that you bow to the front, and this name shouldn’t be too tricky.
The other end, the stern (2), is to the rear. Other than the seat location, many canoes are symmetrical front to back, but sitting the wrong way around in the stern seat can get pretty cramped.
Having your feet planted out wide in the boat helps maintain balance as well, so sitting backwards can make you tippier.
If you ever end up paddling a two-person standard canoe solo, consider sitting backwards on the front seat. This will keep your weight more centered in the boat, and prevent you from doing a wheelie for the whole trip.
The body or shell of the boat is called the hull (3). The hull might have a raised center line on the bottom, called a keel, that helps the boat grip the water and stay going straight. This feature is much more common on aluminum canoes than the plastic, fiberglass, and Kevlar boats commonly used today.
(4) is the spot where you put your butt, the seat. If you’re loading up kids or extra small people into a canoe, try to make sure they don’t sit on the crossbars, called thwarts (5).
They’re designed to keep the sides of the boat, the gunwales (6) apart, not to bear weight, and can snap pretty easily if abused.
Some canoes have small decks (7) fore and aft (that’s front and back to you landlubbers).
They help to add some extra strength to the hull at the ends, or stems, of the boat. Sometimes there will be a wall (bulkhead) at the end of the deck to create a small air chamber, adding bouyancy.
Finally, the yoke (8) is a specially contoured thwart designed to help carry the boat across land, or portage. It’s meant to sit on your shoulders while you carry the boat upside-down.
Most cheaper canoes will be heavy aluminum, plastic, or chopped fiberglass, making the boat a little unwieldy for this, but high-performance fiber boats can be easily carried by one person.
Parts of a Canoe Paddle
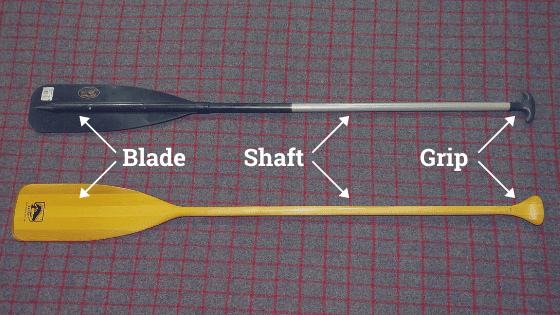
There are three main parts to a canoe paddle: the grip, shaft, and blade. One hand goes on the grip, the other several inches up the shaft from the blade.
Holding on to the grip appropriately is often tough for young kids to understand, but stay with it. To maximize leverage, you want the top of the grip all the way up to the top of your palm, with your thumb wrapping across, and your fingers over the top.
It’s very important to develop an awareness for the orientation of the blade. You can index that location off the grip, but over time you’ll develop an innate sense for which way it’s pointed based on subtle differences in the way the wind and water flow over the paddle.
Safety Appeal

Water sports are more dangerous than many of us realize. According to the US Coast Guard’s 2018 Recreational Boating Statistics (2019 report not yet available), 108 people died canoeing and kayaking that year. 77% of the total boating deaths with known causes were chalked up to drowning, and 84% of those who drowned were not wearing a life jacket.
Not everyone is a strong swimmer. But it doesn’t take much for even an Olympic long-distance swimmer to quickly become a non-swimmer in an accident.
Many jurisdictions, it’s legally required to at least have a life jacket with you, and people under a certain age may be required to wear them. I’d personally always advise just wearing it.
Bear in mind that most recreational life jackets will not turn you face up in the water. Only Type I (Offshore) life jackets are designed to do that. But they can keep you from totally submerging, enabling help to find you.
Know your limits when boating. Just as a new skier needs to start on the bunny hill, don’t head straight for a Class V rapids your first time out. If you’re going on a large body of water, consider bringing a marine radio and other marine survival equipment (this includes very large inland lakes as well!).
Canoe Strokes – Getting Around
Paddling relies on the principle that for every action, there is an equal and opposite reaction (Newton’s Third Law). You push the water one way, and in turn the water pushes back on you.
Water, like air, puts up more of a fight the faster you try to move through it. If you’ve ever tried running in a pool, versus just wading around, you’ve experienced this. The drag of your boat increases with speed, but so does the drag of your paddle.
If you push on water hard and fast, you’ll “grip” the water better with your paddle, enabling you to propel the canoe better.
Of course, you can’t go all out for very long, so pace yourself. But bear in mind that if you’re just leisurely moving your paddle back and forth through the water, you won’t get much for your efforts.
Also, take note of how much orientation matters. With the blade parallel to your movements, it knifes through the water with very little resistance. Switch it to perpendicular and you maximize resistance. Both of these are very, very useful.

Forward Stroke
The most basic canoe paddle stroke there is, you spend most of your time in a canoe using the forward stroke. It moves your canoe forward, and slightly turns it away from the side you’re paddling on.
Reach out in front of you, holding the paddle vertically, and slide the blade into the water. Pull with your bottom hand, the one on the shaft, and push downwards with your top hand on the grip. Twist your torso a bit as well. Much of the power of any paddle stroke comes from your hips and abs.
The paddle should come straight back, staying almost vertical, but taking on a slight forward lean.
Once the paddle reaches your hip, let up and start to smoothly slide it up and out of the water. Now swing the blade out and around, outside the water. Bring it back up to the starting forward position to reset.
Try this out on any large body of water on a windy day. You’ll quickly notice that when you’re heading into the wind, it makes resetting your paddle more difficult. The wind will rip at the blade as you bring it back forward.
This brings us to the concept of “feathering”. As you bring your paddle forward, twist the shaft 90 degrees in your hand, so the blade is knifing through the wind instead.
It’s good to just get in the habit of feathering your paddle every time you reset. The control and awareness this will bring will really help with some of the more advanced strokes.
Reverse Stroke
The reverse stroke is just the opposite of the forward stroke. You reverse the movements, and move the boat backwards.
Start with the blade of the paddle behind you, and slide it into the water. Push forward with your bottom hand, and pull back with your top hand. When you get to the limit of your forward movement, slide the paddle out of the water and reset it to the back.
You can use this stroke to back out of the weeds along the edge of your practice pond, or as “brakes” to slow yourself to a stop while moving forward.
Sweep / C-Stroke
The forward and reverse strokes focus on moving the boat in a straight line. They will each turn the boat slightly, but when you want to turn the boat in a hurry, we can do better.
The Sweep, or C-Stroke, is the steering stroke. It works better from the back of the boat, but can be used from both seats.
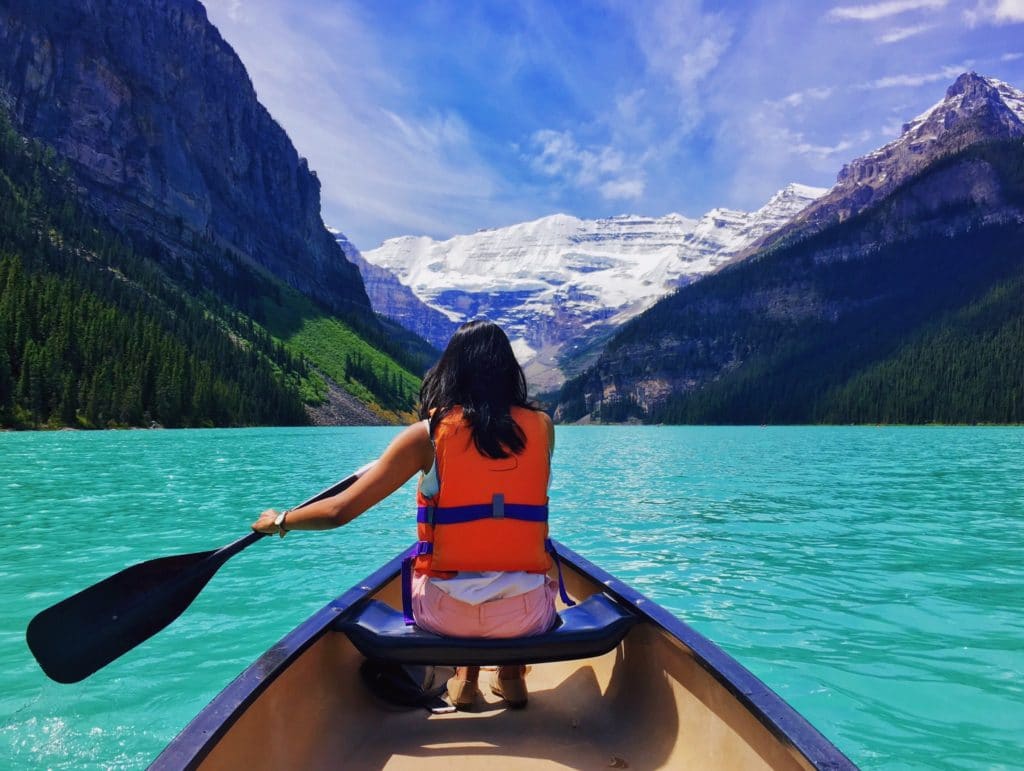
To sweep, hold your paddle angled off to the side, like you’re just getting to the front end of your reset for a forward stroke. Push the paddle out and away from you, locking out your elbow like the woman in the photo above.
Swing the paddle out as far forward as you can, keeping the blade perpendicular to the sky, and slide it into the water. Now trace a large arc, a C-shape, pulling the paddle around at the limits of your outstretched arms.
As the blade nears the hull of the boat, neatly slide it up out of the water, and reset for the next stroke.
This stroke will make your boat turn away from the side you’re paddling on. It can also be reversed to turn your boat while backing.
Catch more canoe strokes in Parts II and III of this guide, coming in the next couple weeks.
Basic Canoe Rescues
When you first start canoeing, plan on getting wet. Your paddle strokes won’t be very refined, which can result in some splashing, and you might end up taking an unexpected swim.
To minimize your chances of flipping, follow these quick tips:
- Stay low as you move around any small boat, don’t stand up.
- Move slowly and consciously, as jerky movements can set you rocking.
- Keep your weight centered in the boat, don’t lean way out to look at a cool rock.
- Try to maintain three points of contact with the boat at all times.
- Spread your weight out laterally in the boat. Keep your feet spread wide while you’re seated.
Capsize Safety
Anytime you capsize a canoe, safety needs to be the first concern. If you’re in a river, even a slow one, try to get everyone upstream of the canoe. Moving water exerts tremendous force, and you do not want to be sandwiched between a canoe and a hard place.
Also, make sure that you keep your feet from getting tangled or caught in anything that could hold you underwater.
Righting the Boat
Once everyone is safe, you can focus on getting back to paddling.
You’ll need to do three things to fix a water-logged boat: dump the water, right the boat, and get back in. We’ll go more into some deep-water rescues in the next article, but to get started, we’ll focus on shallow or narrow water.
When the water is shallow enough, you can just dump the boat, flip it over, and climb back in. Dumping the water works best with one person at either end of the canoe, taking turns going high and low in a see-saw motion with the boat.
Swimming the boat to shore or a raft is the next best thing. Just get to shallow enough water and dump the boat there.
There are ways to rescue a boat in deep water, with help or alone, but they’re a little more advanced and require some practice. For now, bear in mind that there’s a good chance you will tip when starting out, and stay within your limits.
Where to Rent a Canoe
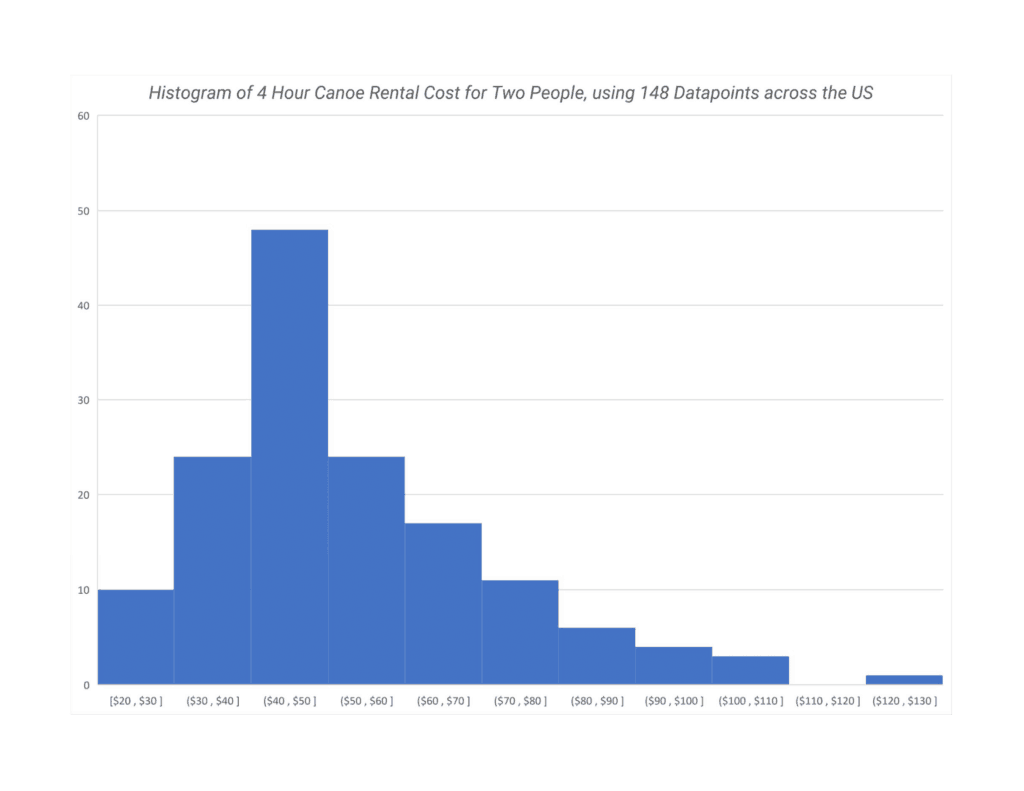
Renting a canoe is a great way to get started. I took the time to go through Google Maps and find the first three canoe rentals for each state (sorry New Mexico, Google Maps only found me two pages of results, and only one of those rented canoes) that came up. I then made the map below, and the histogram of costs.
In doing this, I learned a few things. Google can’t tell the difference between kayak and canoe rentals, for one. That made the task take three times as long as it should have.
You can expect to pay about 40 – 60 dollars for two people to rent a canoe for 4 hours. This can vary by season, and tends to go up a lot in very touristy areas. There are also some screaming good deals out there, so it’s worth hunting around a bit.
You can view the map of the canoe rental agencies I found, along with the histogram and the raw data below. This took a lot of time to put together, so if you reference it, please drop me a link!
For more locations to rent canoes from, check out this tool from Paddling.com. It’s really focused on kayak rentals, but many of the locations will rent canoes as well.
Also, be aware that a decent used canoe can be had on Craiglist or Facebook Marketplace for just a few hundred dollars, so if try it and love it, buying may be cheaper for you.
Just bear in mind that many of these will be super heavy-weight models that people are selling because they’re a pain to move.
What’s Next?
Head on over right away to the next article in the series, How to Get Started Canoeing in 2020 – Part II (Intermediate Canoe Skills)!