
Archery is a great skill, a fun pass-time, and an effective way to put meat on the table. Movies like Lord of the Rings romanticize it to an iconic level, so it’s no surprise that one of my first Google searches as a kid fed up with little homemade bows snapping was “archery camp Wisconsin”. Without that search, I would never have met my wife, and never have become an outdoor kid.
I shot a real bow for the first time at seven years old, while attending a little rustic summer camp in Wisconsin. My experiences that week, the next six summers spent as a camper, and the next ten years on staff came to shape who I am.
Over the decade of combined time I had volunteering as a Counselor-In-Training and working as a Camp Counselor and Trip Guide, I must have taught over hundreds of kids (and adults) to shoot.
Having tried teaching it this way and that to kids young and old, here’s some of my top advice for getting started with this wonderful skill.
Table of Contents
Archery Safety
The two most important rules in shooting archery are: Always Point the Bow in a Safe Direction and No Dry Firing.
Many people are conscious of the first rule once their bow is drawn, but neglect to notice they are in violation of it during their draw. A fair number of new archers either point their bow straight up in the air and pull the string down to draw, or the point it straight down at the ground, draw, and then aim.
Neither of these is really acceptable, they both signal that the user is drawing a bow too strong for them to use well, but the latter is preferable to the former.
In the first situation, if the string were to slip loose of the archer’s fingers, the arrow would be released at a higher-than-intended angle. This angle causes the arrow to either shoot near straight up, or to overshoot the target. Straight up endangers the archer and any bystanders, as the arrow will return to the ground at almost the same speed it left the bow. Overshooting the target, you risk breaking or losing the arrow, causing damage to property, or injuring someone.
If the bow is drawn facing down, a slip could cause the arrow to shoot straight through the shooter’s foot, embarrassing and painful, but not quite life-threatening in most circumstances. Not at all pleasant, but at least you only endanger yourself, and in not nearly as serious a way, as opposed to the more general danger presented to everyone nearby when the bow is drawn facing up.
Dry firing, or releasing a drawn bow forcefully without an arrow nocked, puts excess forces on the string and limbs, which presents the potential for strings to snap violently, or limbs to shatter explosively. Shards of wood or fiberglass tend to be rather dangerous when in flight at high speeds, and the string slapping you wrist, which will occur almost every time you dry fire, won’t feel very good either.
If you are shooting around others, a designated range master is not optional. This is a must to manage the whereabouts of all shooters on the range, so an arrow which decides to pick its own path doesn’t meet with an unsuspecting archer at the next lane over retrieving his arrows. These are hunting weapons, and even a blunt or field pointed arrow can mess up your whole day, not to mention the much messier results of a broad head, which will probably put the threat of loss of life or limb on the table.
Shooting
Go pick up a bow, placing your hand on the handle in the riser, and making sure it’s face up by checking to see where the arrow shelf is (if there is one). Next, nock an arrow, face off with your target, draw, aim, and fire.
If you got all that, you’re in good shape, but it leaves a lot of questions for most newcomers, the answers to which can benefit even the more experienced among us. Which hand goes where? How do you stand? Does the orientation of the arrow on the bow have any bearing on this, since its feathers line up differently based on which way its nocked?
Lets dive in to which hand to use.
Hand and Eye Dominance
There are two considerations to be had when choosing how to hold a bow. The first is the obvious, and most everyone gets it at boy scouts or y-camps – the dominance of your hands.
Usually, kids are told to hold the bow with their off hand, and pull the string with their dominant hand, which is all well and good, but there’s that pesky other important factor that’s missing.
There is another dominance in the body which most people outside target sports don’t know about, and that’s eye dominance.
Just as you have a stronger, more agile hand, so too do you have a better eye. Just like trying to force yourself to write legibly, a fine motor function, with your non-dominant hand doesn’t turn out nearly as well as with your usual hand, you can try to force yourself to aim, a fine motor function of the eye, with the wrong eye, but it won’t turn out near as nicely as with your dominant eye.
It’s actually far easier to side with your eye dominance if there’s a difference between the two than to try to go with your hand dominance.
Finding your Dominant Eye
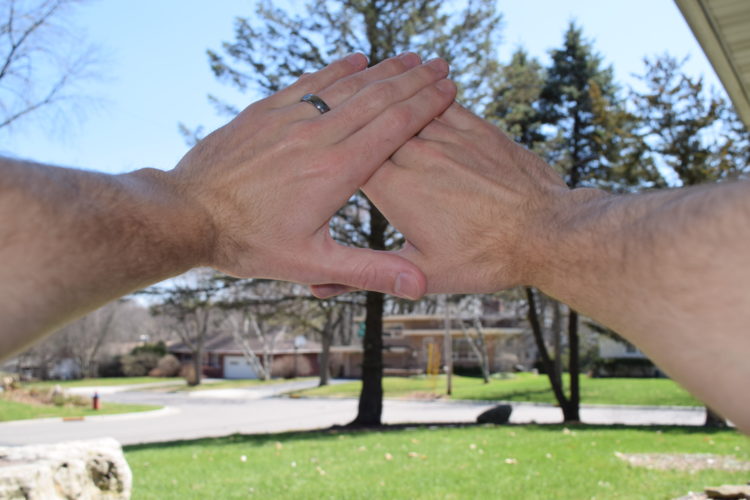
I use a very basic system for this, involving your hands, some far-off object, and possibly a friend to help out if you’re having trouble.
- Make an L-shape with your left and right hands (all the fingers, not just one!), overlap the tips of the thumbs and forefingers of each hand to form a triangle, and close it up so it’s not very large.
- Look out at your object, and bring up your triangle so that you’re looking through it at the object, still keeping both eyes open.
- Now close up your left eye and freeze. Can you still see the object?
- Keeping your hands and head still, switch eyes. Can you see it now?
If you could only see the object with one of your eyes, you’ve determined which one is dominant, the one you could still see it through. If you didn’t have the expected results of one eye yes and one no, try a few more times. Make your triangle smaller the next time you try, and go for something farther away.
If it’s still not working, sometimes having a friend help you out is the way to go.
- Make the triangle with your hands again.
- Frame your object with it, and freeze, holding both eyes open.
- Have your aide cover first one eye, then the other, while you just keep staring at the object.
If you still can’t tell from this, you may be “eye ambidextrous”, where your eyes really aren’t dominant over one another, in which case you should just go by your dominant hand.
Get Your Hands, Bow, and Arrow Organized
Back to the bow, pick it up in the hand opposite your dominant eye, and check that it’s right-side-up by verifying the position of the arrow rest, if you have one.
Square off to the target, side on, feet about shoulder width apart, with your hand holding the bow closer to the target, and perhaps your front foot pointed slightly forward. Don’t do anything that feels awkward here. The goal is to get you in a solid stance that is chiefly side-on to the target, so you have the freedom to draw your bow across your body, rather than into it.
Next comes nocking your arrow, which has its own tricks.
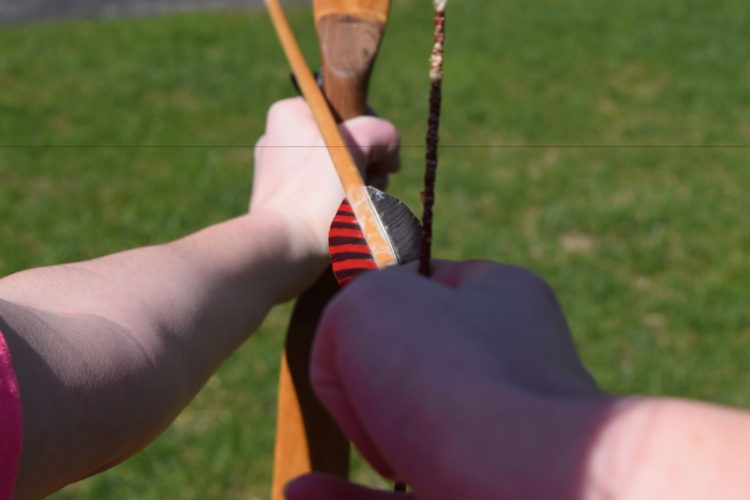
Arrows made for standard bows generally feature one fletching of one color and two of another. That odd colored fletching, referred to as the cock feather, needs to be pointing away from the bow on a standard bow, or down on most compounds.
Depending on your bow, it might even be pointed up, but it will never be pointed in towards the bow, because that will cause it to catch on the bow as it shoots off, stripping the fletching off after a few such shots, and kicking the arrow far off its intended trajectory.
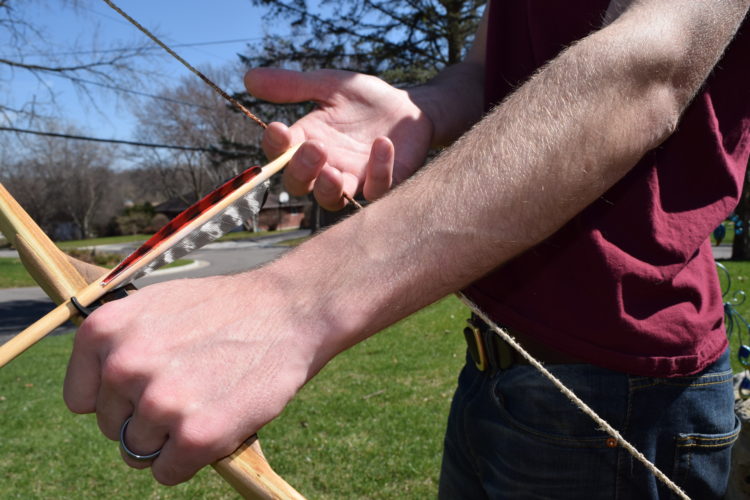
The arrow itself needs to be on the same side of the bow as your hand holding it, resting either on the arrow rest or the knuckle at the base of your index finger.
Once you have figured out the orientation, clip it onto the string, roughly level with the arrow rest or your hand. This can be difficult to do at first, and it helps to lay the whole bow flat like a tabletop while you nock the arrow.
Gripping the String (NOT the Arrow!)
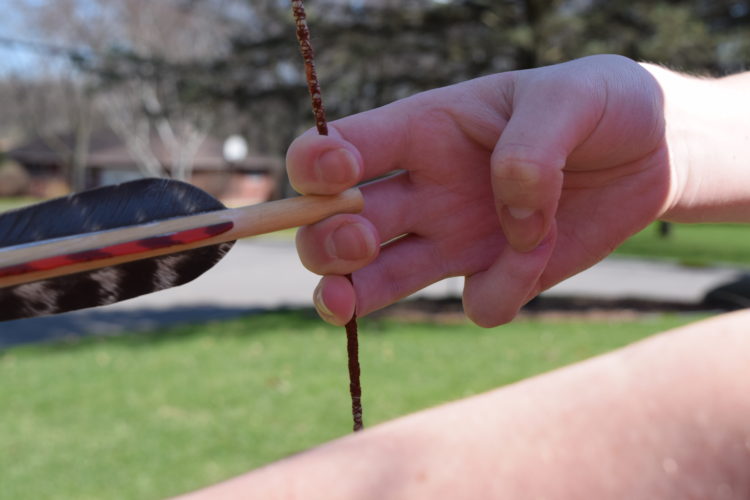
The next step is where almost every beginner will undoubtedly encounter the most trouble, placement and shape of the pulling hand.
There are many schools of how exactly to grasp the string as you draw the bow, and also many Hollywood-driven fallacies on the topic.
If you’ve seen how they shoot in the movie Avatar, do yourself a favor and wipe the memory from your mind. I spent half the last summer with several other experienced shooters attempting to perfect it, and while we were finally able to hit the target with some consistency, it’s just awkward.
Most people will grasp the string sort of like the handlebars of their bike, fingers all wrapped up, and thumb thrown in to keep things closed up. This is WRONG! It will result in a torquing motion on the string while you pull back, no matter how hard you try, and will normally cause the arrow to fall off of your hand or the arrow rest.
It is possible to compensate for this error with a large amount of tilt of the bow the other direction, but this throws off accuracy. The grip also makes your release slower, causing your hand to absorb most of the energy that is supposed to transfer to the arrow.
Look down at your fingers. Starting at the tip, find the three lines across each finger from the underside of a knuckle. The knuckle line closest to your finger tips is where you want the string to sit.
That way, when you want to let the arrow fly, all you have to do is let your hand open. No muscle contractions, no forward motion, just let it relax and it’ll shoot by itself.
Keep your thumb completely off the string and the arrow, just sort of floating naturally near your palm as you draw. Bring it in, and you WILL torque the string.
My personal preference for finger placement is index finger above the arrow, and middle and ring fingers bellow it, all three lined up so that the closest knuckle crease to the fingertips is right underneath the string. I use a slight pressure between the two finger groups to help hold the arrow on the string.
Other mainstream positions are two above, one below; one above, one below; two below; and three below. All of them work, and aside from the all below methods, they’re basically the same thing, just personal preference and finger strength.
Now you’re finally ready to pull this bow back!
The Draw
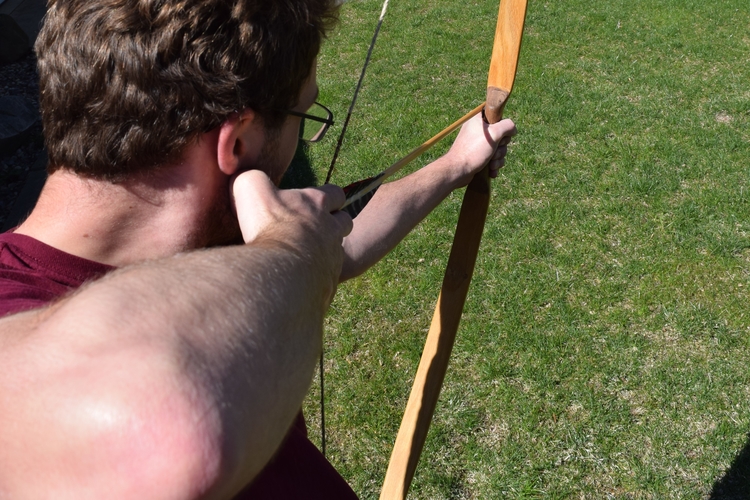
As mentioned at the beginning of the article, you should point the bow at the target first, with your body squared off side-on to the target and your arrow properly nocked, and pull the string straight back, across your body.
Pay very close attention to your forward elbow and forearm! This elbow needs to stay slightly bent, not locked inward. If you lock your elbow, it will rotate your forearm into the path the string will travel, and result in a painful string slap.
Full draw is when you bring your pulling hand to some set anchor point, which you determine. Your anchor point needs to be something consistent. The norm is some part of your hand meeting some part of your face. I personally bring the free-floating knuckle of my thumb, which is not involved in the actual connection to the string, to the corner of my mouth.
Many people anchor to their ear lobe or eye, but be warned, if you wear glasses, either of those anchor points may lead to you chucking your glasses downrange as you release the string.
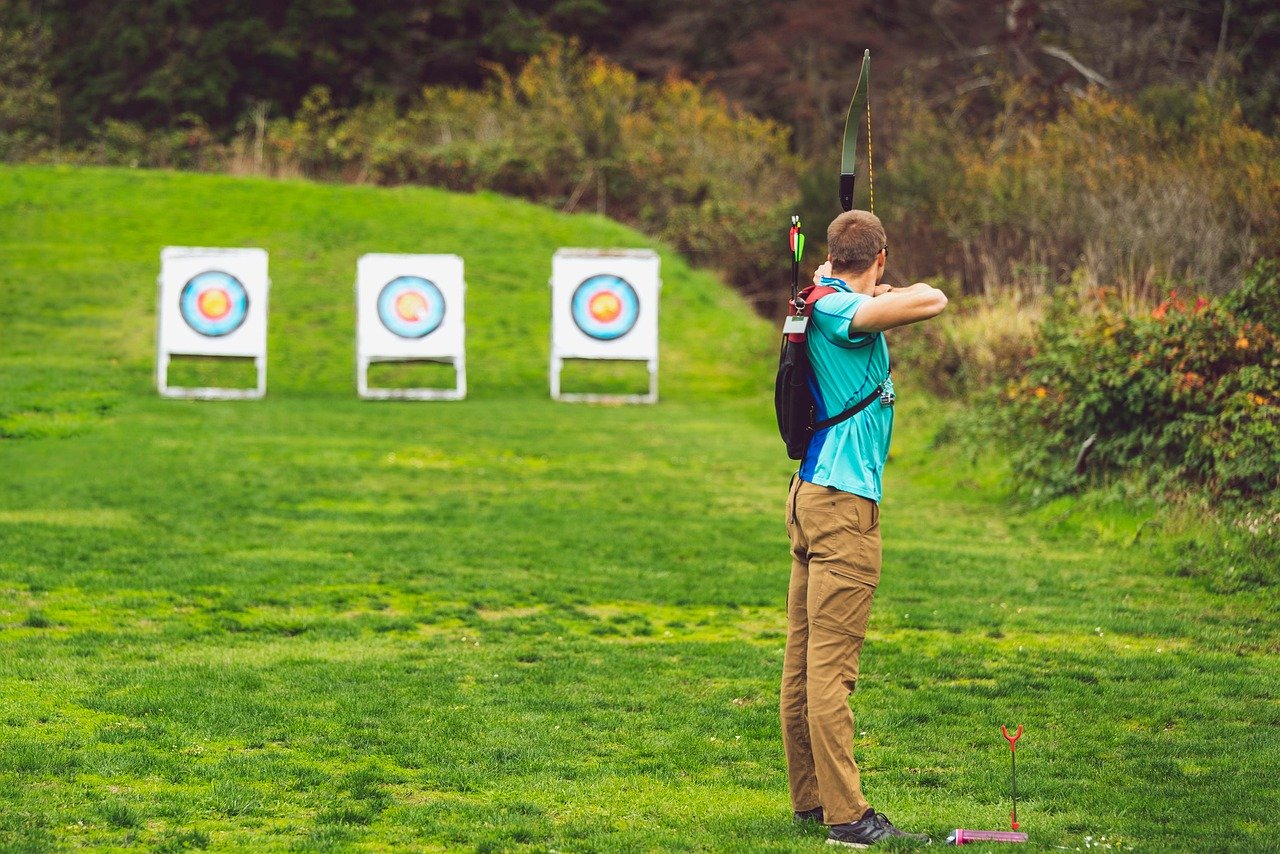
Once you get that anchor point down, take aim at your target. Don’t just aim for trying to hit the whole bale of hay, or the whole paper area. You are aiming for the absolute center of the bull’s eye.
Much of this is psychological, but when many people take aim at something they want to hit, they just aim generally at the target as a whole. If you are aiming at the target, and miss left by two inches, you’ve missed the whole target. But that same two inches off to the left when aiming at the center of the center, and you’re still in the red zone, and plenty accurate enough to drop a deer.
Tips and Tricks
- If you’re experiencing trouble with the arrow falling off the arrow rest or your hand, try tilting the upper tip of the bow away from you maybe ten degrees. This will help gravity help you to hold the arrow in place. Also check your thumb to make sure you haven’t inadvertently let it fall into your string contact area, as this happens to most people the first few times they shoot.
- Don’t expect to be on target the first few times you shoot. In fact, expect to be way off at first. You’ll get better, and you’ll develop the feel. This isn’t like shooting a rifle with a big fancy scope on it, where all you need to worry about is if the wind is going to push you half an inch or one inch off target. You have no sights on most bows, and have to just develop the feel for it. The arrow will drop far faster than a bullet over the distance, so you’ll find that judging distances and adjusting accordingly will be essential, if not immediate parts of your skill set.
- I recommend only shooting with sets of three arrows at a time. That way, if you lose one, you’re more motivated to go find it. Arrows aren’t cheap, and if you made them yourself, you start to become a little more attached.
- You will break arrows, at first from missing and finding rocks or trees with them, but later from shooting too consistently. When you shoot one arrow into another these days, they don’t split nock to tip like in Robin Hood, then generally break the nocks of the arrow off instead. Luckily, that sort is much more easily fixed than an aluminum arrow that’s all bent out of shape.
- In the beginning, it will be important that you shoot a lighter bow than you’ll use once you develop the specific muscle groups, which aren’t used for many other things. You may want to ask around and see if you can borrow a bow while you’re getting into the sport, as you will probably want to up-size once you can handle a bigger bow.
- Try shooting a few different types of arrows, they behave differently. I started in my backyard with aluminum arrows and a target nested into a wood pile, and aluminum arrows hitting maple logs didn’t tend to end well for the shafts. I quickly switched them out for slightly more expensive arrows because of my situation. But in general, aluminum shafts are more durable than carbon fiber or fiberglass, which would explode under different types of stress, and are a great starting point for a beginning archer.
- Make sure your arrows are rated to at least the draw weight of your bow, and have them cut to your draw length, or they’ll never fly right. Too short, you’ll stick one through your offhand. Too long, the flexing just doesn’t work out right, and it’s extra weight you don’t need to bother propelling downrange.
- Grab bright-colored arrows. You’re going to miss the target at first, and bright blue arrows are a lot easier to find than earth-tone or green in the woods.
- Don’t be afraid to ask for advice, and take any criticism given constructively. Trying to wave off whoever is offering it will not work, it’s obvious when you’re new to the sport.
Supplies for Getting Started
If you have the option to do so, just head on down to your local archery shop. Not only do they almost always have extremely knowledgeable staff, they usually have indoor ranges and love helping people get started. There’s no better way to know your draw length, what weight you can pull, and whether or not you like the feel of a certain style grip.
Cabela’s Archery Section and Bass Pro Shop Archery Section have excellent selection, both in stores and online (Free 2-day Shipping as well!), to get you off the ground, as does Amazon.
You could always try building your own bow, but I find that it helps to do a thing the right way the first few times before striking out like that. If you do decide to give it a try, save yourself a lot of failures, go read through my article on how my structural engineering education finally taught me to tiller bows well.
For a good starter bow, draw weight will depend on your size to some extent, but these aren’t muscles you use every day, even if you are an otherwise strong person. These muscles will develop quickly as you learn to shoot though, so borrowing a lighter bow or grabbing an adjustable bow is a good idea to get started.
For a recurve bow, I’d start with a Bear Bullseye, draw weight depending on your size.
A compound bow may be a better long-term investment, as you can adjust the draw weight over a wide range, but they’re more expensive upfront. The cheapest quality compound that Bass Pro Shop has to offer is the Bear Archery Vast Compound Package, which adjusts from 40 lbs to 70 lbs draw weight.
When you’re picking your first arrows, I would recommend some aluminum shaft if you can find them affordably (more durable, but a little more expensive nowadays) arrows with a synthetic vane that’s 3″ or 4″ long.
Bass Pro Shop’s arrow selection is massive, and can get a little intimidating, so if you don’t want to try picking yourself, the BlackOut® X5 Envy Carbon Arrows with 4” Vanes – Size 400 is a good budget-friendly place to start.
And of course, you’ll need something to shoot at. Grab a target online from Bass Pro, or head on out to your local sporting goods store for more options.
Whether you’re new to the sport, or just looking for a few tips, I hope this article has helped you in some way. If you have questions or comments, please leave them below!
Thank you Steven, I really appreciate it!
Ben, thank you for the informative article. I haven’t picked up a bow since I was a child in summer camp. But I was toying with the idea of renewing the skill. I found this article very helpful as a starting point.